
If you follow me on Instagram, you’ve probably seen all of the cupcake bites I’ve been posting lately. Don’t get me wrong, I still love and adore cake pops, but these little treats are so quick to make!
But anyone can pour melted chocolate into a mold, right? Impress the pants off of your friends and family by adding some designs on the bottom!

For this tutorial, I’m only focusing on how to do the accent designs (that’s why the pictures will just show peanut butter cup shape pieces of chocolate). This technique can be easily incorporated into Cookie Bites or Cupcake Pops.
To get started, you need two basic pieces of equipment, both costing less than $2 each.
 Most craft stores sell peanut butter cup mold trays. I prefer the Make’n Mold brand from AC Moore. Wilton’s mold is a wider diameter, and the mold cavities are more shallow, which doesn’t give you much room to hold on to when dipping the top part.
To create chocolate accents, you need to do make those designs first, before pouring in your main color of chocolate – this will make the accent and the rest of the mold to be one smooth piece of chocolate, which always makes my friends go, “how did you do that!!!?”. Sssh, our secret 🙂
Dip your toothpick into the chocolate, and start decorating. An easy design to try first is polka dots… simply dab the chocolate randomly around the mold. You can also draw basic shapes like a heart.


After creating your accent designs, allow the chocolate to harden. To speed up this process, you can place the mold tray in the fridge or freezer for a few minutes.
My favorite accent technique is writing little messages. This can be a little challenging because you need to write the words backwards.
 Be cautious of creating narrow spaces when making your designs. Melted chocolate has a thicker consistency… its not thin like water which will get in every tiny crevice. For example, I tried making this chevron pattern…
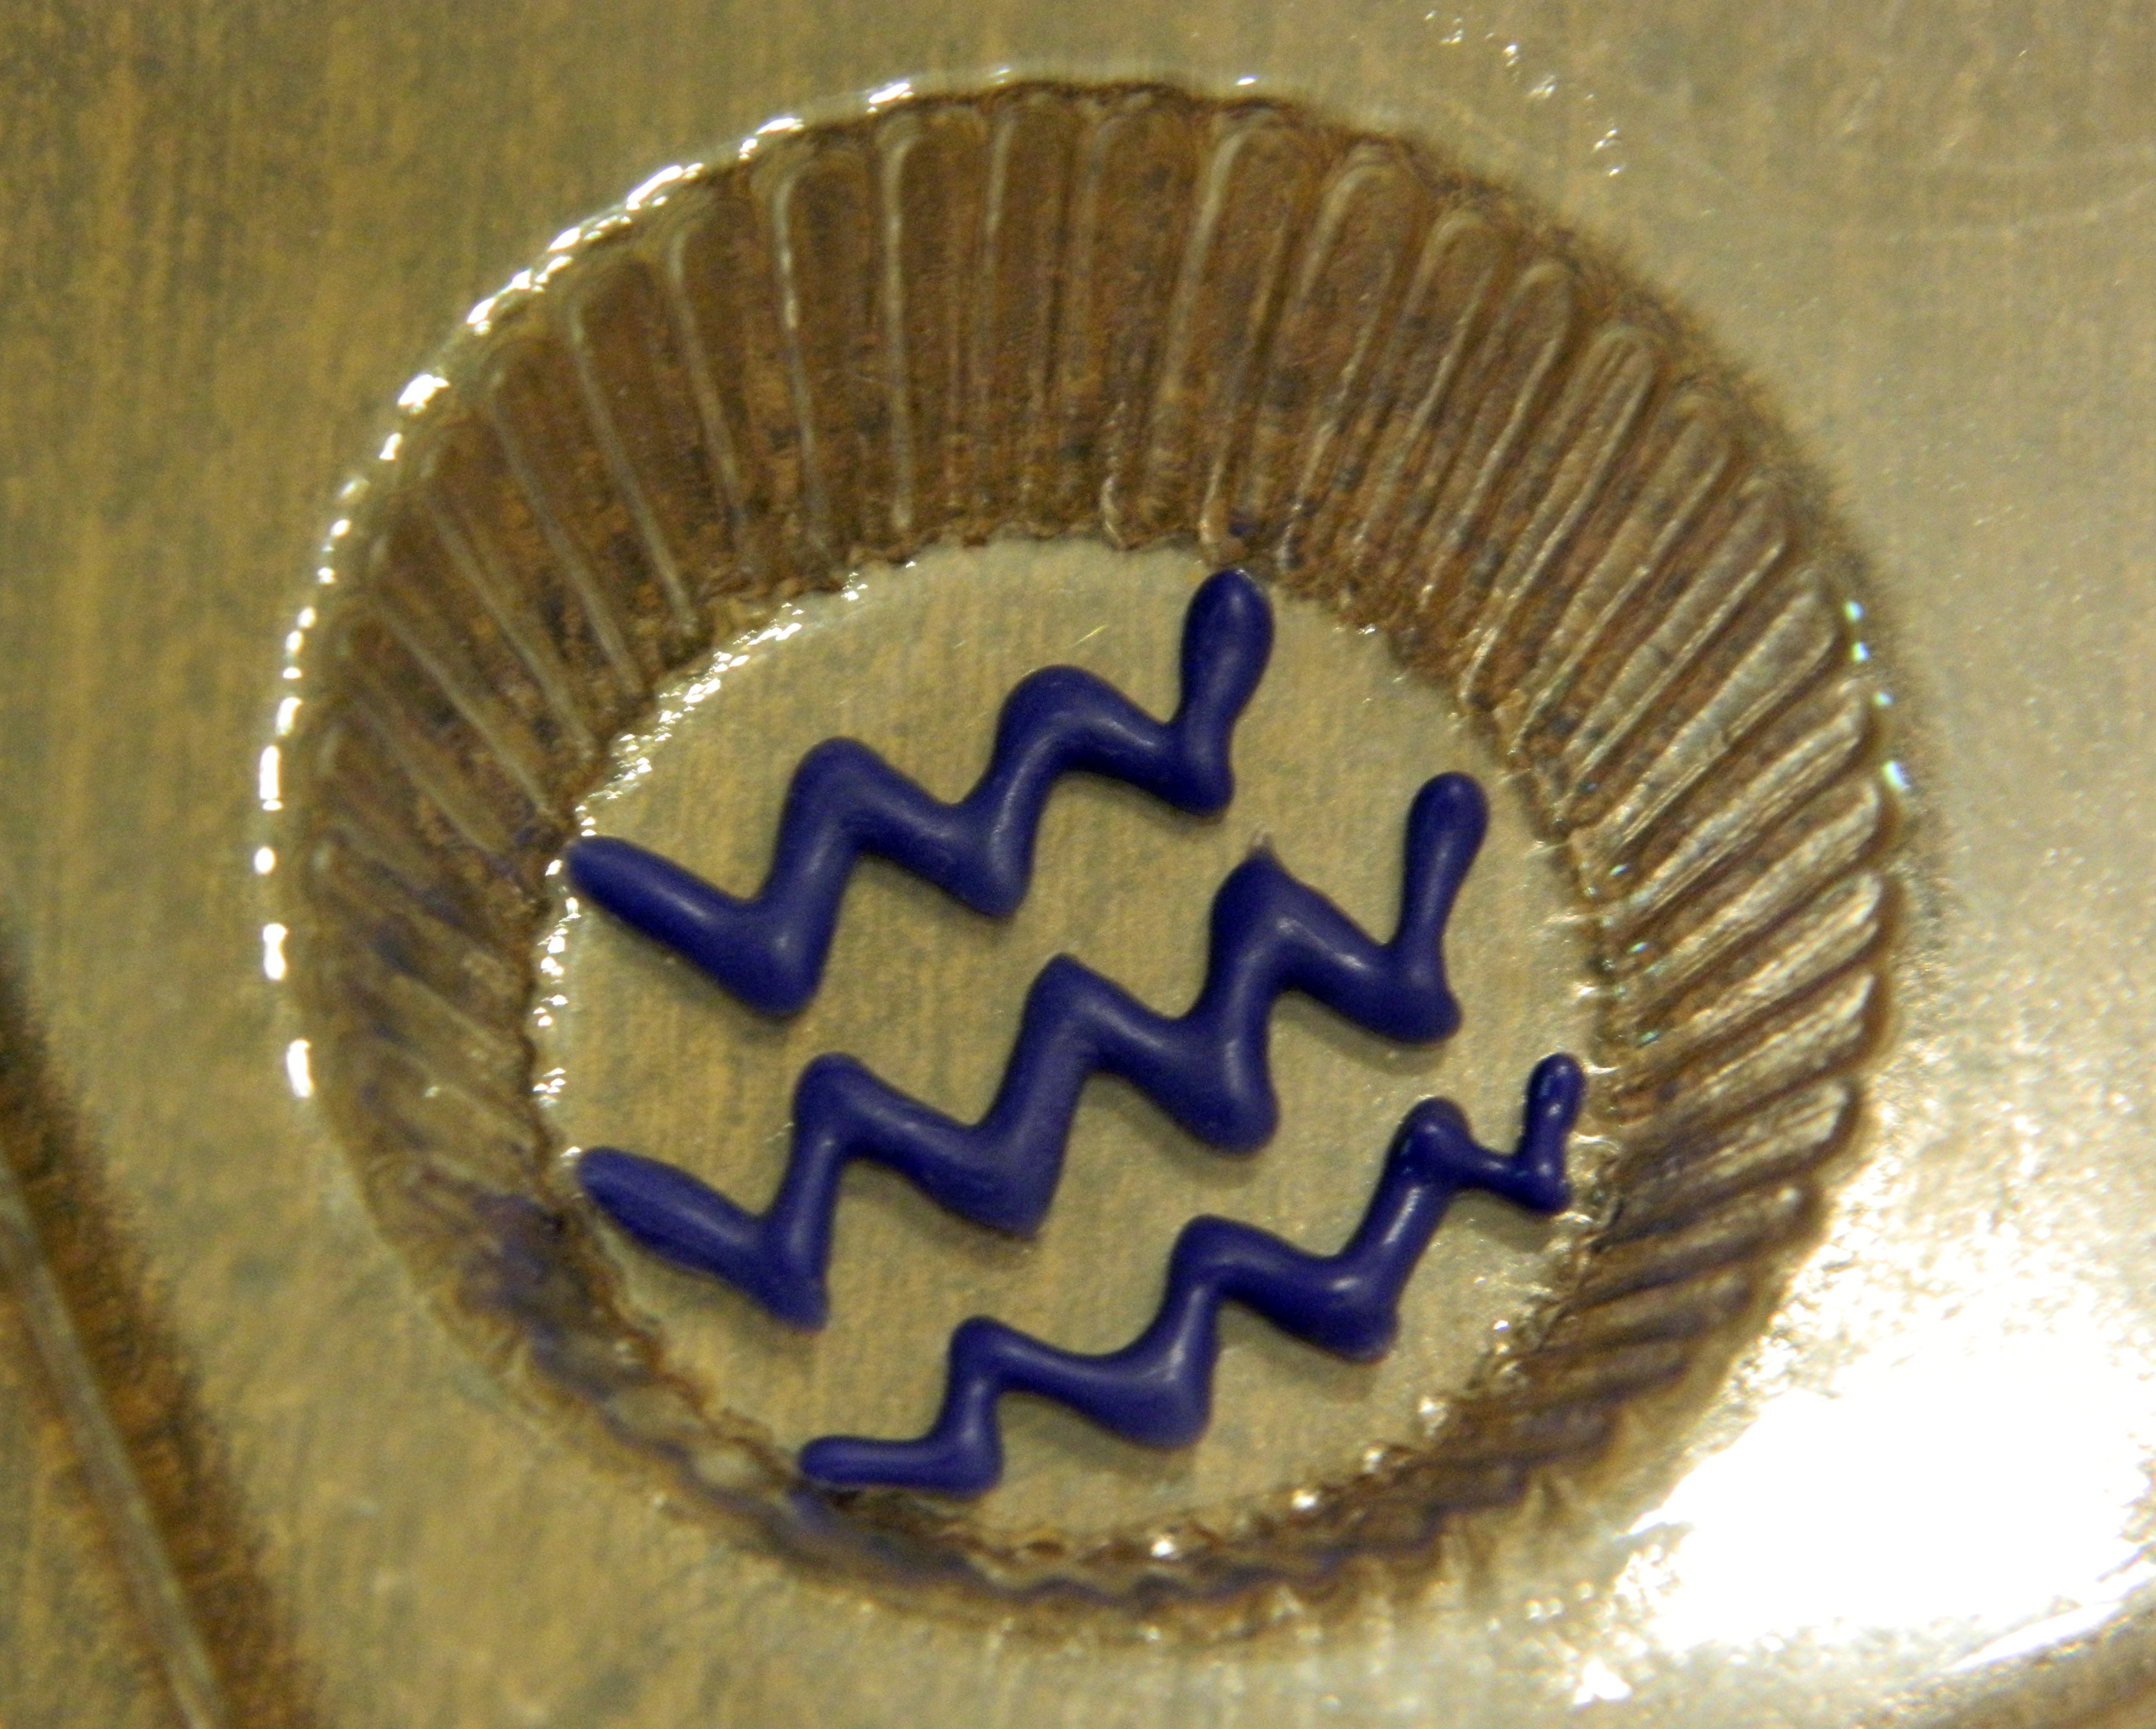
But after I filled it with chocolate and it hardened, it left some tiny gaps in the corners of the “V”.

Temperature and consistency of your melted chocolate definitely play a big role here. The cooler your chocolate gets, the thicker it gets. Also, if your chocolate is just thicker in general, try mixing in some oil or paramount crystals to thin it out.
Unleash your creativity, the sky is really the limit on this one – try different shapes, words, color patterns, etc. And don’t forget, practice makes perfect. Here are some ideas I did recently to get you started…


A word of caution when cleaning your peanut butter cup molds… do NOT put them in the dishwasher or clean them with really hot water… the plastic melts, warps and loses its shape. Luke warm water does the trick just fine.

I often get asked what molds I use, or how I get my cookie/cake balls to fit just right into the mold cavities… so, I’m going to give you everything I use! (brand new versions of course).
GIVEAWAY (Now Closed)
- Prize: one (1) 1.5″ OXO cookie scoop, two (2) Make’n Mold Peanut Butter Cup Mold Trays (12 cups/tray), t
- wo (2) boxes of toothpicks & o
- ne (1) Devil Spatula.
And the winner is…


I use ghirardelli for truffles and candy quick for dipping and cookie molds.
new at this, wilton chocolates, is what i’ve used.
I use Wilton because that’s what we have here.
I love to use Candiquik for the white chocolate, make n mold for the colors and Wilton for the milk and dark chocolate!
I like using guittard chocolate and Merckens.
I follow you on Facebook 🙂
I have a recipe from Weight Watcher that uses a raspberry jam filling – it’s a hit at home and the office!! I’ve been using candy cups since WW calculated the points. The look pretty in gold foil; just a small space to work in. The treat is rich and wonder if the mold would be to big. . .
I have only used Wilton for dipping!
I follow you on twitter! @vyscakepops
I follow you on Instagram! @vypassetti
I reposted and tagged your pic on Instagram!
What a fun contest 🙂 we use Wilton but love the Make and Mold pure White chocolate the most 🙂
I love using Merkens brand chocolate for my cakepops and treats.
I use merckens and never had a problem with it, so I never ventured to try other brands.
Posted your picture on instagram. Thanks for sharing tips and for the cool giveaway.
I Like KC Bakes on Facebook
I Follow KC Bakes on Twitter
I’ve only used Wilton and Make a Mold chocolates to make my cake pops out of those two I definetly prefer Make a Mold!
I usually just use Wilton candy melts, but I also love using ghirardelli chocolate chips.
I always use Wilton. And I absolutely adore these! Too cute!!
I like you on Facebook!
I like KC Bakes on facebook.
I use either Wilton or ghirardelli chocolate chips.
I follow KC Bakes on twitter.
I follow KC Bakes on Instagram!
I tweeted about your giveaway!
I follow KC Bakes on Twitter!
I follow KC Bakes on Facebook!!
I tweeted about your giveaway!! 🙂
I like KC Bakes on FB and shared it. I follow you on twitter and twittered about the awesome giveaway. Happy Valentine´s day everybody.
Laura
Always Ghirardelli chocolate!
I follow you on FB!
Shared on FB but for some reason I couldn’t tag you 😦
Posted on Instagram!
I use Wilton Candy Melts. It took me a few times to get the perfect melted consistency for my cake pops and candy molds but I prefer Wilton’s to any other brand!
I shared your post on Instagram 😉
I reposted your Instagram picture onto Facebook!
I like you on Facebook! 😉
I reposted your contest on Facebook!
I follow ya on Instagram. (I feel like a stalker!) lol
And I use ambrosia almond bark from my local grocery store for most of my cake pop dippin!
Shared the giveaway on Facebook!
Merckens is my chocolate of choice … and I love this tutorial! Thanks so much!!!
I follow you on facebook!
I usually use semi-sweet chocolate chips or Wilton Candy Melts!
I follow on FB!
i shared on FB!
I love make n mold 😊
I prefer to use candiquik because the consistency is soooo easy to work with but if I need colors I use Wilton because its readily available
I currently use ambrosia almond bark or wilton candy melts
Already a fan of KC Bakes on FB!
I absolutely love Chocoley chocolate for all my cake pops! I’ve tried other brands, but this tastes the best!
I use almond bark for dipping and make n molds for the color 😄
Shared and Tagged on FB!!!
Already a fan on FB!!!
i use almond bark or wilton candy melts
already follow you on twitter!!!
follow on instagram!!!
reposted and tagged on instagram
shared on twitter as well!!!
I like you on Facebook!
My chocolate of preference is Merkens.. Its not so thick as wiltons..Thank You
I am already a liker on FaceBook!
I follow on Twitter @SoniaRules
I like you EVERYWHERE …. I’ve fallen in love with Almond Bark for my white candy coating.
I follow on Instagram Chaconia Desserts
Shared on instagram
Shared on Twitter
Shared on FB!
I follow you on twitter @cookie_counter
I follow you on instagram @the_cookie_counter
Shared on FB!
Shared on Instagram!! @chaconiadesserts
Tweeted on twitter @soniarules
I use wilton brand chocolates!
I like to use merckens but I don’t have any good stores near me so I end up settling with Wilton a lot.
I like how I leave a comment here last @_@;;
Okay favorite chocolate to use would have to be.. I haven’t used too many chocolates.. so I don’t have a brand, usually almond bark works best for me.. but I’m thinking Milk Chocolate most definitely, even though I love white, I usually have a better chance at getting it nice and smooth 😉
I shared on twitter
I reported your picture on Instagram
Supposed to say reposted! Dang auto correct!
I’ve only used Wilton and Guittard for dipping.
I like KC Bakes on Facebook
I follow you on instagram
I follow KC Bakes on twitter
I follow you on twitter
I follow KC bakes on instagram
I follow you on facebook
I shared the contest on facebook
Make n Mold! not a huge fan of wilton
Like KC Bakes on Facebook!!
I also follow on Instagram!!
Just reposted posted on Instagram too!
I’ve only used Wilton candy melts. I like to try out different brands, but haven’t yet.
I follow you on Facebook!
I use Wilton candy melts
I follow you on Instagram…………..Love the Blog
HI! Awesome tutorial! I have always used Wilton Candy melts but recently been trying Make & Mold brand and like it as well!
And…I just reposted your giveaway on Instagram
I Like KCBakes on Facebook!
And I follow on Instagram
I shared it on Facebook!
I follow on Twitter!!
And I re-tweeted on Twitter!
So many to choose from! For a regular white and brown color/chocolate I use almond bark. Now If I have money too splurge I really like chocoley bada bing bada boom! And for all colors I just recently fell in love won’t Make n’ Mold! These I have named all melt beautifully and I hardly ever have to use anything to thin them out!
I just uploaded pic and tagged you on instagram!
I follow you on Facebook
Just shared giveaway on my Facebook!
Just followed you on twitter !
Just shared your pic on twitter and tagged you!
And I follow you on instagram, there 7! LoL
I’m following you by Sweet Bakes by Monique…and I LOVE to use Merkens chcolate for my cake pops. 🙂
I mainly use Merckens chocolate for my pops
I follow KC Bakes on Facebook
I follow KC Bakes on Instagram…even tho’ I’m Instagram challenged…LOL
I also follow KC Bakes on Twitter
I’ve only tried Wilton’s candy melts, so for now those are my favorite.
I tweeted! And followed
I liked on fb ! 🙂
I use merckens but I’m thinking of switching to make and mold because its so expensive
I don’t think I have found a favorite yet! But i use Wilton and ac moore the most… I want to try merkens one day as well !
I follow kc bakes on Instagram
I like kc bakes on Facebook
I use regular chocolate chips! I never have candy melts when I need them!
I follow you on Facebook!
My preferred dipping chocolate is Guittard A’Peels! So smooth and tastes great!
I like make n mold
I reposted KC Bakes pic on Instagram
I liked KC bakes on FB
I like to use Wilton.
I like KC Bakes on Facebook
I shared this giveaway on Facebook
I shared this giveaway on Twitter
I use Wilton chocolate.
I already like you on Face Book
So far, I have only used Wilton’s Candy Melts for dipping.
I shared your give away on Face Book
I use wilton!
Just reposted on Instagram!
I used Wilton Candy Coatings:)
I follow you on Instagram 😀
I reposted on Instagram 😉
I follow you on Instagram
I have always just used chocolate coating.
I Like KC Bakes on Facebook
I Follow KC Bakes on Twitter
I tweeted about this giveaway https://twitter.com/jessrwarfield/status/302442931648872449
I shared this on facebook too! https://www.facebook.com/junk.graham/posts/309176962519333
wilton or what I get at abc decorating in phoenix
I use merckens and an occasional wilton brand if im in a pinch and have run out of M.
I follow you on facebook , I used wilton
already liked on Facebook
I follow kc bakes on facebook!
Wilton
I follow you on Facebook.
I follow you on face book 🙂
For Cake Pops I use Wilton’s for any chocolate base (I LOVE their dark cocoa), but when I’m catering or doing something extra fancy, I try to buy Merckets ahead of time because their colors are SO bright and their chocolate is excellent.
My Favorite chocolate so far is Wilton. Lots of colors and easy to get
I follow you in instagram 🙂
I follow you on Twitter 🙂
I like you on FB!
I follow you on Twitter!
I wish I could use wilton (b/c of the price) but I seem to only be able to use Merkens!
My favorite brand of chocolate is Plymouth Pantry’s candy coating for white/brown. For colors, I use Merckens!
I like KC Bakes on Facebook.
I follow KC Bakes on Twitter.
I follow KC Bakes on Instagram.
I like you on Facebook!
I follow you on Instagram!!
I ALSO follow you on facebook!
I am following you on Instagram
I follow you on Twitter
I use Make N Mold Chocolate for my cake pops and hope to find something better!
Ghirardelli has an amazing 2.5 pound bar of melting/dipping chocolate. It comes in white or double chocolate flavors. Everyone loves it and it is ridiculously easy to work with!
I’ve always used Wilton until recently when I stumbled across Log House melting chocolate bar. It melts like silk and dipping is so much easier. And you can dye it to any color you want with gel coloring. Love KC and might be ordering another stand from you soon. 🙂
My favorite so far (as I’m new to cake popping)is Wilton & Candiquik, but I’ve been wanting to try Merckens, I hear a lot of awesome things about it.
I use Wilton chocolate only for my cake pops. I add a little canola oil to it to thin it out.
I’ve used both Wilton & Merckens. I like Merckens much better for taste. Pricier though.
I follow you on Facebook.
I follow you on Twitter.
Whoot hoot! I use Wilton and Merkens Chocolate melts.
I use Wilton & Almond Bark
I followed you on twitter @yanai31
I follow you on Instagram @klove_31
I follow you on facebook KM Cake Pops
I’m here! I’m at your blog! And I’m on my phone! Yay! Ok I like to use make n mold best! 👍
I liked you on facebook 😄
I tweeted about the contest to my 14 followers ahahaha 😄
I follow you on Instagram!
I reposted the giveaway on Instagram! only thing left is to get on the computer and tag you on my fb page! yeeehawww
On yea I follow you on twitter too! 😝
I follow you on Instagram @zaysmommy
I have always used Wilton; until I visited my son and went to A.C. Moore I bought an assortment of Make n Mold wafers. they are 2 oz more in a bage and less expensive than wilton. but the melting quality is better esp on the white and colors. I so wish I didn’t have to drive 3 hours to get to an A.C. Moore. Love this idea and can’t wait to try it out.
I’m already following you on Facebook ^_^
I’ve been following you on Instagram ^_^
I re-posted your giveaway pic, and tagged you, on Instagram yesterday ^_^
I’m currently using Wilton Candy Melts, but I also have tried using Nestle chocolate chip baking morsels–pretty much any chocolate I can get my hands on. I’ve even used some Scharffen Berger bars that I found at a Big Lots–SO GOOD!!
Wilton chocolates ❤
I followed you on instagram and liked all your photos
I use Guittard chocolates, and Make n Mold as my second choice for some of the darker colors. Last possible resort is Wilton, but I also and not a fan of Merckens since they don’t have a good shelf life and melt horribly for me.
I follow you on Twitter
And I like you on Facebook 🙂
I follow you on Facebook.
My favorite chocolate to use is Merckens.
Make n mold for sure! Used to be obsessed with wilton!
Wilton always performs well, smooth and easy
I use Wilton’s but have never tried anything else.
I like you on Facebook!
I follow you on twitter!
I haven’t made cake pops yet but I like to bake with Guiradeli.
I Liked and follow you on Facebook!
Merckens!!!! Best candy melts.
I already like you on facebook and twitter.
I use Wilton’s because they are sold at the stores nearby. I have never tried another brand.
I can only find Wilton locally but I have never tried ordering online or anything.
We use Wilton and Merkens!
I like Wilton myself !! I follow you on facebook as well 🙂
I use Wilton melts and I found out about this because I do follow you on facebook 🙂
I use the Aldi Brand 85% chocolate bars.
Merckens chocolate is the best!
My preferred chocolate is a brand called Ambrosia. I know that my local store in texas has it, but I dont’ know where else it is carried. If I need a color, then I use the brand Hobby Lobby carries (but not Wilton).
What a cool Idea!!! I love this!!!! you’re followed on Facebook and after this reply, i’m headed to instragram!!! Favorite molds Wilton, I use a lot of their chocolate, so that’s my go to for the molds too!!!!
I liked on Facebook
I like you on fb!
I shared the giveaway on FB!
Trader Joes…
i’ve only used merkin wafers .maybe it’s time to try something different.
I use Wilton’s because it’s what’s available locally.
I usually use Wilton’s. I want to start trying out Merken’s though.
For colors I use Wilton Candy Melts. For white chocolate & chocolate I use Almond Bark.
Wilton is my favorite
I use candiquik most times.
I follow on Instagram.
I would prob use Wilton’s b/c it’s all I know. I never made anything, but if I won it I would certainly try it out. Liked on FB already 🙂
I follow on fb /twitter
I like using almond bark.. 🙂
Liked on fb
Shared on FB
I use ghirardelli for all my chocolate needs.
I follow you on Facebook.
I usually use chocolate chips, but it hasn’t always turned out well. I think I’ll have to follow some of the other suggestions!
I follow on Facebook!
Wilton’s Chocolate
I use Wilton Candy Melts. Don’t love them but not sure what else to use.
Would like the opportunity to try to make these, I follow u on FB and IG
I use Wilton Candy melts for my cake pops!!! 🍡
i like kc bakes on facebook
Merkens for white and dark chocolate and Wilton for other colors
I follow on FB!
I love using Wilton chocolate due to how sturdy and easy to use it is. Have it set up in the fridge or freezer and it has a strong high melting point, perfect for shipping!
I shared the give away and tagged you.
Oh and I am already a fb fan 🙂
i follow kcbakes on twitter
I follow On twitter!
Ghiridelli
I’m following on Instagram 🙂
I just shared the give away on FB
Ghiridelli…definitely
i like using the wilton brand
I shared on twitter!
I like to use the hershey melts or Wilton. I’m a hobby Baker so just starting to experiment on cake pops. Your pb cups look amazing. Must try these! !
Wilton brand chocolate
Merkins & Wilton’s
I like KC Bakes on Facebook!
I follow on Instagram. 🙂
Merkins & Wilton
Following KC Bakes on Twitter (@mommababycakes)
My preferred brand chocolate to make cake pops is Ghiradelli.
I like to use Wilton brand 🙂
I like you on Facebook!
So far, I’ve only tried Wilton Candy Melts. I’ve been curious what others like too!
Merckens 🙂
Liked KC Bakes on Facebook.
my favorite cakepop maker is kc bakes!!!
I like you on Facebook!!
I tweeted about the giveaway! @mommababycakes
And, now! I follow you on Twitter!
Gheradelli
Whatever I use it’s great quality chocolate.
I’m a Wilton girl. But I also like almond bark
This post is brilliant and has inspired me to have a go as a spur of the moment thing. I hope you don’t mind but I linked your post to one of my blog posts to share it with others – Check it out: http://katysbakes.wordpress.com/2013/05/20/chocolate-galore/ and see my dodgy first attempts..