
Last week, I shared Part 1 of this tutorial, showing how you can make tags without using a computer. All you need is some cute scrapbook paper, some craft punches and you’re set!
Today I’ll show you how to make your own custom, professional-looking tags on the computer. I use PowerPoint 2007 to design my tags; I’m sure there are other programs out there, but this is what works best for me.
If you need clarifications on any part of this post, please email me with your questions (kcbakes@hotmail.com) – its so much easier for me to explain that way, rather than in the comment section.
Create A Template
When creating tags, it is more efficient to use a craft punch. This ensures you get the same shape every time, and its much less taxing on your hands than using scissors. But how do you know that your design will fit within the confines of the punch area?
Create a template, so that anytime you want to make tags, all you have to do is open a file. I use a 1.5″ round punch to make my own tags, so I need to create a 1.5″ circle shape in PowerPoint.
To make my first template, I used the “line” tool. Make sure your top and side rulers are displayed:

With the line tool selected, drag out vertical and horizontal lines (shown in pink) that are 1.5″ apart – this will create a 1.5″ square area… picture making a tic-tac-toe board.
 After you make the lines, select the circle tool. Click and drag it from the top/left corner to the bottom/right corner, creating a 1.5″ circle.
Delete your spacing lines (the pink ones in my pic) and you’re left with a correctly-sized circle. Save the file as “tag template”, so the next time you want to make tags, you can start with a ready-made circle.
Tip 1: when designing your tags, try to keep the top/center area clear… this is where your hole punch will go later on.
Tip 2: when you are ready to begin a new tag design, after opening your tag template file, immediately “save as” a new file, ex. “Basketball Tags” – this way you don’t accidentally save over your template file and have to create a new one from scratch.
Adding Words
Once you have your tag template,the rest is up to you. Do you want to add words, design, clipart, etc? Adding words is pretty simple… just click on the Text Tool and drag out an area to the size of your tag.

The font most likely will be size 18 by default – keep in mind you’re creating a 1.5″ circle… depending on the font type, usually size 10 – 12 works just fine.
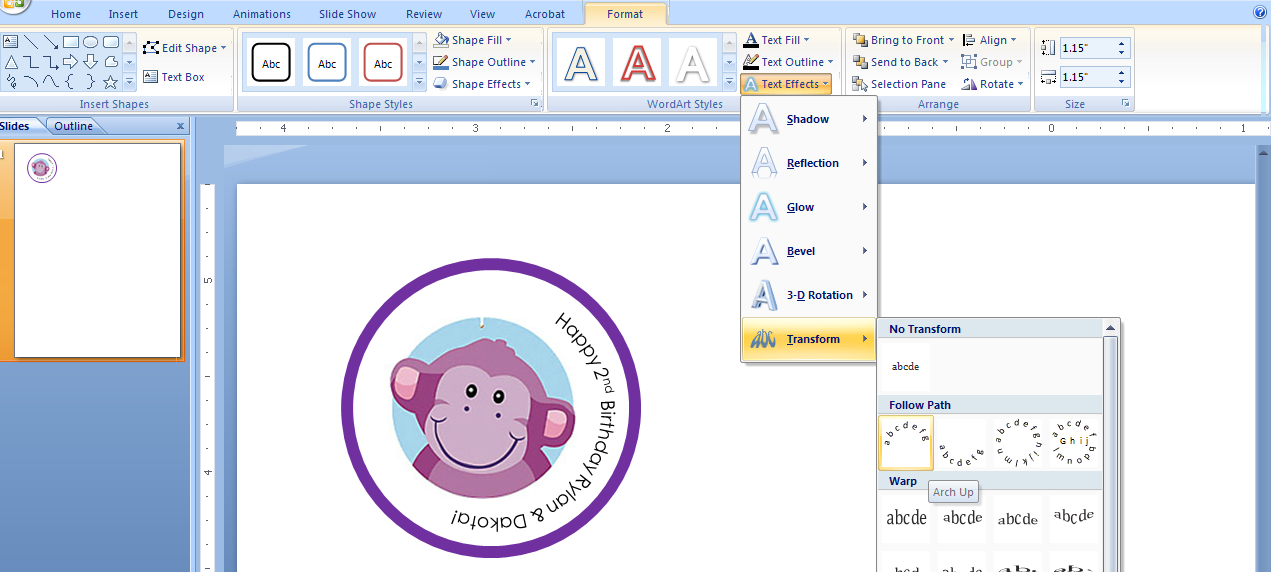
Depending on your clip art, you may need to bend the words around the image. Use the Text Effects in the Format menu to transform your words to best suit your tag.
Think Outside of the Template
Speaking of clip art, sometimes its tough to find an image that fits inside the tag template and gives you enough room to add text.
Try placing your image off-center, with some of it outside of your template boundaries… you will see the excess image while designing it, but – look at the image on the right – when you cut out the tag, it’s not noticeable!

Creating Flair
These tags are some of my favorites… they are simple and clean, yet the inner dashed circle really elevates it to a designer level.
To create that stitched effect, use your circle tool and create a circle that is just slightly smaller than your original tag template. Then, in the Format Menu, you can change the thickness as well as the dash pattern.

Getting Fancy
Another cool effect is to add a thin line within your tag template border. To do this, copy your circle image, and change its color (shown in pink here). Then, using your mouse or arrow keys, line the the pink circle up over your original circle. If its lined up correctly, after you move it, you shouldn’t be able to see the purple circle.

Then, change the thickness of the pink circle to make it thinner than the purple circle, and it will give you a neat look. (click image to enlarge)

If you want to get even a little fancier, change the pink line to a dashed line!

Other Shapes
I tend to stick with the circle shape because it allows me to use my round punch. But if you want to get creative, there are quite a few selections in the Shape Menu that would make for interesting tags.
Tip: if you’re selling your treats or donating them to an event, make some tags with your contact information so that future potential customers know how to place an order with you.

So Charming
Cake pop charms are a really cute way to give your treats some personality. Two of the charms I use most often are diaper pins for Baby Showers and crosses for Baptisms or First Communions, both from AC Moore.
(check out my baby rattle cake pop tutorial!)

Hole Punch Choices
Early on in my tag making, I used a simple hand-held single-hole punch… I think they cost a whopping $1 at Staples. But the more I made tags, I didn’t like how it left that big gaping round hole.
A few months ago, I found this cool hand-held rectangle hole punch at Michael’s for $6.

It’s just the perfect width for twistie ties, ribbon, etc. And now my tags don’t have that big hole missing from the tag, its just the little slot.

Printing
When your tag design is finalized, copy/paste it across the page… I can fit 20 tags per page that are nice and evenly spaced.

For best results, print your tags on white cardstock. I don’t have a printer at home, so I always save my tag files on a thumb drive and go to Staples. It’s about $1/page to print in color, which works out to be $0.05 a tag.
If you need some tag inspiration to get you started, here are some tags that I’ve made over the last few months: Cake Pop Tag Gallery. I also have some Freebie Tags that are ready-made and free to download.
—
I think that about wraps it up! I hope this post helps you to create some fabulous creations for your treats… tag me if you post pics of them so I can see your awesome work!
Instagram: http://instagram.com/kcbakes
Twitter: https://twitter.com/kcbakes
Pinterest: http://pinterest.com/kcbakes/
YouTube: http://www.youtube.com/kcbakes/
If you enjoyed this tutorial, please subscribe to my blog by entering your email at the top/right corner! 🙂 There are more tutorials in the works, stay tuned!

This is soooooo wonderful. Thank you so much!!!!!!
Where do you get your clip art from? Right off your computer or do you use a separate program/software?
where is your line tool located? I can’t find mine or dont know exactly what you mean on your tutorial. thank u.
Your tutorials are so concise and detailed…. you should have been a teacher!! I really appreciate all your effort as I’ve been wanting to make tags for ages. I just got my two punches online from Amazon here in the UK (no chance of anything in the shops!). I’m going to give it all a go as soon as I get a break from pops and chocs!! Thank you, thank you, thank you! xx
Thanks for sharing!! This is awesome! 🙂
I just gave you a cyber hugggggg!!! perfect timing. Someone was going to charge me $1.0 each for simple tags so I figured it was cheaper to purchase the label factory program. I saw your post just in time!!! I will try this first and see how I like it. Thanks so much for sharing.
OMG you and I have so much in common! This is exactly how I do my tags, and I send an email to Officemax to have them printed. They know me so well at Officemax! LOL… This is awesome, one thing I didn’t do was create the circle template. I just created one document and kept using the same document to start new orders. I’m going to start doing a template from now on! – Sabrina from Inspiration Event Services in Cali!
This tutorial is Fabulous!!! I’ve been looking online for months for something exactly like this!! Thank you so much for sharing!! 🙂
WONDERFUL! I’ve been doing the first method with the hole punch out forever but I’ve been wondering how to do these. Thank you so much!
what is a line tool i can’t find it
Awesome!