
Tags
Long before I started making cake pops, I was making cakes. With practice, I became pretty good at various aspects of cake design, but one skill I could never really master was lettering. My hands weren’t that steady using food decorator pens, and cutting letters out of fondant was such a tedious task.
Enter a popular, fast-growing trend in baking, cake bunting! I wish I knew about it in my cake days! Bunting is a cute & inexpensive way to personalize your desserts, giving them a really professional look… and it’s so easy to make!

Supplies Needed (total cost = under $10 at AC Moore)
- Scrapbook paper
- Paper straws (or bamboo skewers, dowels, etc.)
- Baker’s twine
- Glue stick

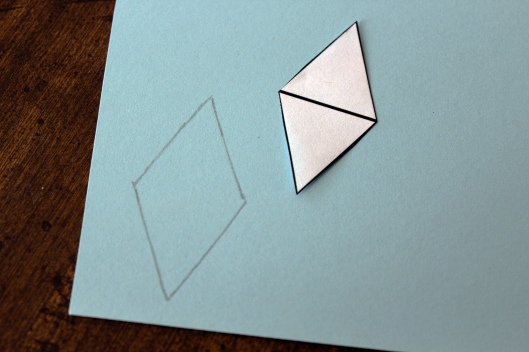
Most bunting is done in a pennant style, or with triangle-shaped flags. However, in order to attach the flags to your baker’s twine, you need to cut out a diamond shape so that you can fold them in half, around the twine (more on that later).
I printed out a diamond shape from PowerPoint and traced it onto the scrapbook paper. Retrospect being 20/20, I should’ve printed the shapes directly onto the scrapbook paper and saved myself a lot of time. If you have a Cricut, this step will be a breeze.
One thing to consider is the amount of letters you need and the width of your dessert. If you’re making a 6″ cake for someone named Catherine (9 letters), you’ll need to keep the diamonds smaller than 1″ in diameter (which is pretty small)… or ask if she goes by Cathy 😉
Scrapbook paper is thicker than normal paper, and at first, I found it a little tricky to bend the diamond in half and get a nice, even crease. Using a razor blade, I pressed it firmly into the paper diamond.

I didn’t cut the paper, this just made a thin indentation across the middle of the diamond, making them much easier to fold evenly into triangles.
After you fold them in half, they still pop open like this… kind of like paper Pacmans. Using the handle of your scissors, press it down hard along the folded edge of the triangle to get a firmer crease.

Plain paper can be a little boring though. Create a faux-stitching effect by making dashed lines around the flag border with a thin-tipped marker.
 To attach the flags to the twine, I used a purple glue stick so that I can see where the glue is going (it dries clear). Notice how I left a thin margin at the crease glue-free?

Keeping the crease glue-free is an important step. Other tutorials I’ve seen will have you glue or tape the flag directly onto the twine… but then it’s stuck in place, and you don’t have any flexibility to adjust the flag spacing on the twine.
Place the twine in the glue-free zone, then press press the top triangle firmly onto the bottom triangle. Liquid glues take longer to dry, but using a glue stick, it adhered right away.

As I mentioned, handwriting hasn’t been my forte. Luckily, craft stores have a huge variety of letter stickers to choose from. Ta da, we have bunting!

Attaching the twine to your paper straw is easy peezy. Simply wrap the twine around the straw and tie a knot, and it will stay in place on its own. I draped the ‘tail’ of the twine around the straw a few times just so it wasn’t a single strand hanging aimlessly.

When you’re all finished, simply insert the straws into the cake!

I didn’t have a cake handy for demonstration purposes, so I staged the bunting in my Skinny Mini cake pop stand… but this got me thinking – bunting could be used to decorate the front of your cake pop displays too!
The great thing about bunting is you can customize it to any party theme. Play around with different colors or patterned paper. Darice Bakers Twine comes in really cute multi-color packs – twist a few different colors together!
Will you try bunting for your next dessert? If so, email me a pic at kcbakes@hotmail.com.

Adorable!!
Reblogged this on Cake Pop Blog and commented:
How sweet is this?! Thought I’d share another cute KC Bakes tutorial!
Love this! Thanks for sharing
I love this!!! I can’t wait to try it with my stand!